In this post, I will tell you how you can move your existing Wordpress blog to Jekyll, the static site generator.
If you don’t know what Jekyll is or why you might want to move to it, take a look a blog post I wrote about that: The blog is now on Jekyll instead of Wordpress!
![]()
Get the docs
To learn Jekyll, the first place you want to familiarize yourself with is the Jekyll docs: https://jekyllrb.com/docs/home/
Any questions you might have about configuration or what certain things are, can probably be answered there.
Decide on hosting
At this point, you might want to decide if you are going to host your site yourself, or just do it on Github pages.
I hosted my site on Github pages, because then all you have to do to publish changes is to do a git push to your repo.
Github Pages
If you want to use Github pages, just follow the directions here: https://pages.github.com/
All the code you create for your Jekyll project goes into the repo, and whenever you push your changes to that repo, Github will build your site and host it for you.
Neat, huh?
You might also want to use your own domain name (instead of the default username.github.io).
To do that, just follow the instructions here: https://help.github.com/articles/using-a-custom-domain-with-github-pages/
Self hosting
If you instead want to host the site yourself, just put whatever is built in the “_site” folder on your web server.
That is great thing about a static site generator. Just generate your static site (which can be found in your “_site” folder), and host it.
Install Jekyll
If you haven’t already, install Jekyll on your machine like this:
$ gem install jekyllIf that doesn’t work, you might be missing some requirements:
There are a few pre-requisites to installing jekyll, so depending on your machine, you might have to install them. The docs can luckily help you out there: https://jekyllrb.com/docs/installation/
Set up a base project
Now that you have your hosting decided upon, you can create a base Jekyll project.
I suggest that you either start with the super basic Jekyll starter which you can get like this:
$ jekyll new site-nameThat will set up everything you need, and you can start experimenting with the configuration and design by hand.
What I recommend though, is to find a theme to start from. That’s what I did.
You can find themes several places, but jekyllthemes.org seems to be the best place to get them right now: http://jekyllthemes.org/
If you want to buy one, there are a few good ones here too: http://themeforest.net/category/static-site-generators/jekyll
You can download a theme and just use that as a base. It usually has the entire jekyll structure set up ready for you. You just have to change the configurations and tweak the design to your liking.
And add content of course..!
Get all your content from Wordpress
The next step is to get all that precious content you already have created, over to a format that works for Jekyll.
Which is Markdown. Btw, I love that the format is Markdown, because it is a much more global format that could be easily used in another context than Jekyll.
But your Wordpress content is not in a Markdown format, so what to do?
Well, fear not (too much).
There is a plugin for that!
https://wordpress.org/plugins/jekyll-exporter/
The Jekyll-Exporter plugin is very very easy to use. Just follow these instructions:
- Select Add New Plugin
- Search for Jekyll-Exporter
- Install It
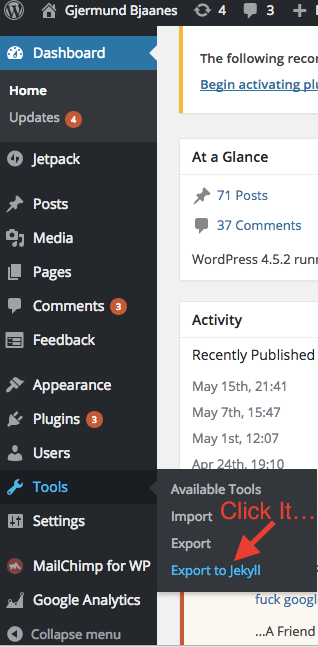
- Click on it in the tools menu
I have even create two screenshots for you!
Step 1-3:

Step 4:
You will get a zip file which includes all your content. Actually, you will get a simple Jekyll site back, with all your content included in it.
You don’t have to use all of it, you can just merge what you need into your base project (or merge the base project into your export).
The point is that all your content is now in neatly set up Markdown files which probably for the most part work out of the box.
You might have to go through them and verify that links and images are OK, but since the Plugin brings permalinks with it, you should be mostly OK.
I did spend some time (actually still going through all the posts) to clean up the markdown source a little bit.
Either way, just test your content properly.
Bring your own Disqus
If you use Disqus, you probably want to bring it along. Luckily, that works out pretty well if you have the same URL to each post.
Actually, from what I understand, you should probably link the disqus panel to a unique id for each post.
The Jekyll-Exporter actually brings along that id, but I haven’t used it myself. Just something you might want to consider.
For now though, what you need is to get a small disqus snippet you can use.
Open this link: https://disqus.com/admin/universalcode/
And copy the the snippet that is generated for you.
Place it in a file called “disqus.html” inside your “_includes” folder. That HTML file can now be included in our layouts, which allows for some nice and clean code.
The file should look something like this now:
<div id="disqus_thread"></div>
<script>
    /**
     *  RECOMMENDED CONFIGURATION VARIABLES: EDIT AND UNCOMMENT THE SECTION BELOW TO INSERT DYNAMIC VALUES FROM YOUR PLATFORM OR CMS.
     *  LEARN WHY DEFINING THESE VARIABLES IS IMPORTANT: https://disqus.com/admin/universalcode/#configuration-variables
     */
    /*
     var disqus_config = function () {
     this.page.url = PAGE_URL;  // Replace PAGE_URL with your page's canonical URL variable
     this.page.identifier = PAGE_IDENTIFIER; // Replace PAGE_IDENTIFIER with your page's unique identifier variable
     };
     */
    (function() {  // DON'T EDIT BELOW THIS LINE
        var d = document, s = d.createElement('script');

        s.src = '//sitename.disqus.com/embed.js';

        s.setAttribute('data-timestamp', +new Date());
        (d.head || d.body).appendChild(s);
    })();
</script>
<noscript>Please enable JavaScript to view the <a href="https://disqus.com/?ref_noscript" rel="nofollow">comments powered by Disqus.</a></noscript>
Let’s actually use this fancy include in our post.html file (the one located in the “_layouts” folder):
Find the following line:
{{ content }}and change it to this:
{{ content }}

<hr>

{% include disqus.html %}
You should now see your disqus threads, if the URLs are unchanged. If you are testing locally, or if the URL of the posts have changed, the disqus threads will probably be empty.
This might be where the disqus identifier id could be of some help, but like I said, I haven’t looked into that specifically.
When I deploy my site to my real domain, all disqus threads are loaded correctly.
I learned the disqus tricks from this nice blog post on girliemac.com: http://www.girliemac.com/blog/2013/12/27/wordpress-to-jekyll/
Fix social links
Your blog should be functional and working at this point, but social links are not like you would expect them to.
The shares are not like they used to. There is no excerpt or pictures automatically added when you share on twitter or facebook.
Right now, it is just a link, which looks rather dull. This is how you want your links to appear like automatically:
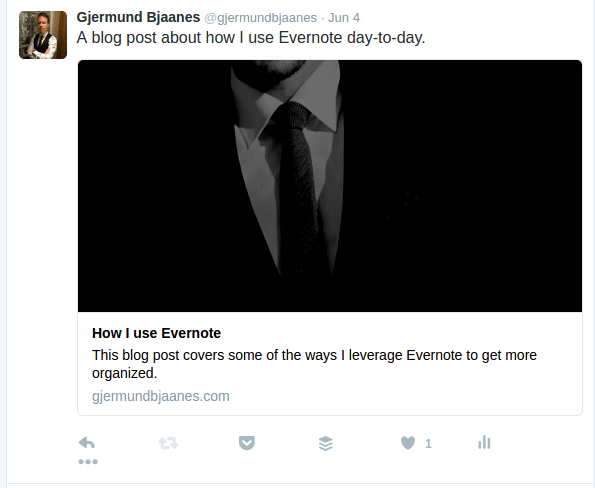
To solve this, you need to add some metadata to the HTML “head” tag. This will probably be in a file called “head.html” in your “_includes” folder (I say probably, because it might depend on your setup and theme).
For a more in-depth guide, check this out: http://aramzs.github.io/jekyll/social-media/2015/11/11/be-social-with-jekyll.html
If you just want to know what I did, here is the code I added for my site:
<meta name="description" content="{{ site.description }}">
<meta name="author" content="{{ site.author }}" />
<meta property="og:title" content="{% if page.title %}{{ page.title | strip_html | strip_newlines | truncate: 160 }}{% else %}{{ site.title }}{% endif %}">
<meta property="og:description" content="{% if page.excerpt %}{{ page.excerpt | strip_html | strip_newlines | truncate: 160 }}{% else %}{{ site.description }}{% endif %}">
<meta property="og:url" content="{{ page.url | replace:'index.html','' | prepend: site.baseurl | prepend: site.url }}" />
<meta name="twitter:site" content="@{{ site.twitter_username}} " />
<meta name="twitter:description" content="{% if page.excerpt %}{{ page.excerpt | strip_html | strip_newlines | truncate: 160 }}{% else %}{{ site.description }}{% endif %}" />

{% if page.title %}
    <!-- Article specific OG data -->
    <!-- The OG:Type dictates a number of other tags on posts. -->
    <meta property="og:type" content="article" />
    <meta property="article:published_time" content="{{ page.date }}" />

    <meta property="article:author" content="http://twitter.com/{{ site.twitter_username}}" />
    <meta property="article:publisher" content="http://twitter.com/{{ site.twitter_username}}" />

    {% for tag in page.categories %}
    <meta property="article:tag" content="{{ tag }}" />
    {% endfor %}

    <meta name="twitter:card" content="summary_large_image" />
    <meta name="twitter:creator" content="@{{ site.twitter_username}} " />
    <meta name="twitter:title" content="{{ page.title }}" />

    {% if page.image %}
        <meta property="og:image" content="{{ page.image }}" />
        <meta name="twitter:image" content="{{ page.image }}" />
    {% else %}
        <meta property="og:image" content="{{ site.url }}/{{ site.header-img }}" />
        <meta name="twitter:image" content="{{ site.url }}{{ site.header-img }}" />
    {% endif %}

{% else %}
    <!-- OG data for homepage -->
    <meta property="og:image" content="{{ site.url }}/{{ site.header-img }}" />
    <meta property="og:type" content="website" />
    <meta name="twitter:card" content="summary" />
    <meta name="twitter:title" content="{{ site.title }}" />
    <meta name="twitter:image" content="{{ site.url }}/{{ site.header-img }}" />
{% endif %}
To make this work, you need to keep in mind all the configuration variables that are referenced here.
Notice things like site.twitter_username, site.description, site.author etc.
You can of course hard-code this into the head.html file, but since we are good developers, we pull this kind of stuff into our configuration. Many of these configurations should be reused other places, after all.
I suggest that you try to configure as much of this as you can in your _config.yml file.
Here is the part of mine that makes most of this metadata work out:
# Site settings
title: Gjermund Bjaanes
header-img: img/bg.png
email: bjaanes@gmail.com
copyright_name: Gjermund Bjaanes
author: Gjermund Bjaanes
description: "A blog about programming, productivity and lifestyle"
baseurl: ""
url: "http://gjermundbjaanes.com"
twitter_username: gjermundbjaanes
github_username:  bjaanes
facebook_username:  bjaanes
email_username:  bjaanes@gmail.com
So, that’s it! Not too bad for a full migration of your content? There is still some tweaks you might want to do to your site, but I suspect that you’ll figure that out (just check the docs, or ask someone).
I hope you got some value out of this guide. If you have any questions or just want to chat about how awesome Jekyll is, comment below, or reach out on twitter.
 Follow me on Twitter: @gjermundbjaanes